
Better Than a Crack: The 100% Free Autocut & Opus Clip Alternative for Premiere Pro

Lewis Shatel
5 min read
18 nov 2025
Better Than a Crack: The 100% Free Autocut & Opus Clip Alternative for Premiere Pro
The Subscription Trap vs. The 'Crack' Risk — Why Editors Are Looking for a Third Way
Let's be honest about the situation every working editor faces. You open your browser, you search for a plugin that removes silences or burns in animated captions, and you immediately hit a wall: $29/month here, $49/month there, an annual plan that locks you in for $300+ before you've even tested whether the tool fits your workflow. That's the subscription trap, and it's designed to bleed you dry one billing cycle at a time.
So what does a rational editor do? Some go hunting for a cracked version. Type "Autocut crack" or "Opus Clip nulled" into a search engine and you'll find dozens of results promising the full suite for free. It feels like a logical workaround — until it isn't. We'll get into exactly why that path is dangerous in the next section.
The point is this: editors shouldn't have to choose between paying a subscription they can't justify and gambling their workstation on a sketchy installer. There is a third way. PremiereGPT is a completely free, officially distributed plugin that lives directly inside Adobe Premiere Pro and delivers the core automation features that Autocut and Opus Clip charge a premium for — silence removal, AI-powered captions, and viral hook detection — with zero watermarks and zero monthly fees.
This article is a practical breakdown of how to use it, why it's the smarter professional choice, and how it can directly improve your organic reach and audience retention metrics on every platform you publish to.
Why You Don't Need an Autocut Crack — Security Risks vs. the Stability of an Official Free Tool
Here's what actually happens when you download a cracked plugin. The installer runs with elevated permissions because Premiere Pro extensions require deep system access. That executable you just ran? It had full read/write access to your file system, your network adapter, and potentially your Adobe credentials. You won't know anything is wrong until your project files are corrupted, your client's footage is compromised, or your machine is part of a botnet.
Beyond the security vector, cracked plugins are notoriously unstable. They're patched by people who don't have access to the original codebase, which means every Premiere Pro update has a high probability of breaking the crack entirely. You end up spending more time troubleshooting a broken plugin than you save by not paying for it. That's a net loss in billable hours.
There's also the legal dimension. Using nulled commercial software is copyright infringement. If you're running a production company or billing clients, that's a liability you genuinely cannot afford — especially when a legitimate, free alternative exists.
PremiereGPT eliminates every single one of these problems. It's a free tool distributed through official channels, built specifically for Premiere Pro, and maintained with proper updates. No cracked DLLs. No suspicious background processes. No license key generators that double as keyloggers. You get professional-grade automation legally, for free, with the stability of a tool that's actually designed to work with your NLE — not against it.
Tutorial: 10-Second Silence Removal with PremiereGPT
This is the feature that makes editors immediately understand why PremiereGPT is a legitimate Autocut free alternative. Silence removal — the process of detecting and cutting dead air, filler pauses, and "uh" gaps from raw interview or talking-head footage — is one of the most time-consuming manual tasks in the edit suite. Here's how to do it in PremiereGPT in under ten seconds of setup time.
Step 1: Install PremiereGPT
Download PremiereGPT from the official source and install it as a Premiere Pro extension. It integrates directly into your Extensions panel — no third-party launcher, no separate application running in the background consuming RAM.
Step 2: Select Your Clip or Sequence
In your timeline, select the clip or range of clips you want to process. This works on individual clips in the source monitor or on a full sequence. For talking-head interviews, select the entire A-roll track. PremiereGPT reads directly from your timeline — no export, no upload to an external server.
Step 3: Open the Silence Removal Panel
Inside the PremiereGPT extension panel, navigate to the silence removal function. You'll see threshold controls — this is where you set the decibel floor below which audio is classified as silence. For most talking-head content, a threshold between -40dB and -50dB works well. Adjust based on your room noise floor.
Step 4: Set Your Padding
Padding is critical. It's the number of frames PremiereGPT leaves on either side of a detected silence before making the cut. Set too tight and your cuts will feel abrupt; set too loose and you're leaving dead air on the table. For conversational content targeting TikTok or Reels, 3–5 frames of padding gives you snappy pacing without sounding robotic.
Step 5: Execute and Review
Hit the process button. PremiereGPT analyzes the audio waveform and makes ripple cuts directly in your Premiere Pro timeline. No round-trip to a browser. No re-import. Your sequence updates in place, your multicam clips stay synced, and your color grades remain intact. Review the cuts in your timeline, and you're done.
What used to take 30–45 minutes of manual razor-tool work on a 10-minute interview now takes under a minute. That's the Autocut value proposition — delivered completely free, without the subscription, and without the security risk of a cracked installer.
How to Generate Viral Smart Captions for Free
Captions are no longer optional. Platform data consistently shows that videos with on-screen captions outperform those without on every major platform — higher watch time, better audience retention curves, stronger algorithmic distribution. The problem is that professional animated captions, the word-by-word kind that pulse and highlight in sync with speech, have historically required either a paid tool like Opus Clip or hours of manual keyframing.
PremiereGPT generates these captions for free, directly in your Premiere Pro timeline, with no watermarks. Here's the workflow.
Step 1: Transcribe Your Clip
With your clip selected in the timeline, trigger PremiereGPT's transcription engine. It uses AI speech recognition to generate a word-level transcript with precise timecodes. This is not a bulk block-of-text transcription — every individual word gets its own in/out point, which is what enables frame-accurate animated captions.
Step 2: Choose Your Caption Style
PremiereGPT offers multiple caption animation styles. The word-by-word highlight style — where each spoken word pops or changes color in sync with the speaker — is the format that dominates TikTok, Reels, and YouTube Shorts right now. This style is proven to increase organic reach because it keeps viewers' eyes engaged and reduces the cognitive load of following fast speech.
Step 3: Customize Typography
Set your font, size, color, and highlight color directly in the panel. For viral hooks on short-form platforms, high-contrast combinations — white text with a yellow or neon highlight on a semi-transparent background — consistently outperform subtle styling. These aren't aesthetic opinions; they're informed by what drives audience retention on algorithm-optimized content.
Step 4: Render to Timeline
PremiereGPT places the caption graphics directly onto a new track in your Premiere Pro sequence. They are fully editable — you can adjust timing, correct transcription errors, change styling — all without leaving the NLE. Compare this to browser-based tools like Opus Clip, where your footage leaves your machine, gets processed on a remote server, and comes back as a flattened file with a watermark unless you're on a paid tier.
No watermarks. No upload. No subscription. This is the Opus Clip free alternative that professional editors have been waiting for.
Beyond Basic Cutting: Using AI Copilot for Viral Hooks
Silence removal and captions are table stakes. Where PremiereGPT genuinely separates itself from basic automation tools is in its AI Copilot — a conversational interface inside Premiere Pro that lets you interact with your footage using natural language prompts to find high-retention moments, restructure narratives, and identify the viral hooks that the algorithm rewards.
Here's how to use it strategically.
Prompting for Hook Identification
After transcription, open the AI Copilot panel and prompt it with intent. Instead of generic queries, be specific about your platform and goal. For example:
"Find the three moments in this interview where the speaker makes a bold claim or counterintuitive statement. These are my hook candidates for TikTok."
The Copilot analyzes the transcript and returns timestamped results with the relevant quote. You can jump directly to those moments in the timeline with a single click. This replaces the manual process of scrubbing through footage looking for the "good bit" — a process that can consume 20–30% of your total edit time on long-form source material.
Prompting for Audience Retention Optimization
You can also prompt the Copilot to analyze pacing and flag sections that are likely to cause drop-off. Ask it to identify segments where the speaker pauses excessively, repeats information, or goes off-topic. These are the retention killers that tank your algorithm performance, and catching them in the edit is exponentially more effective than trying to recover with thumbnails and titles after the fact.
"Identify any section longer than 20 seconds where no new information is introduced. Flag these as potential cut points."
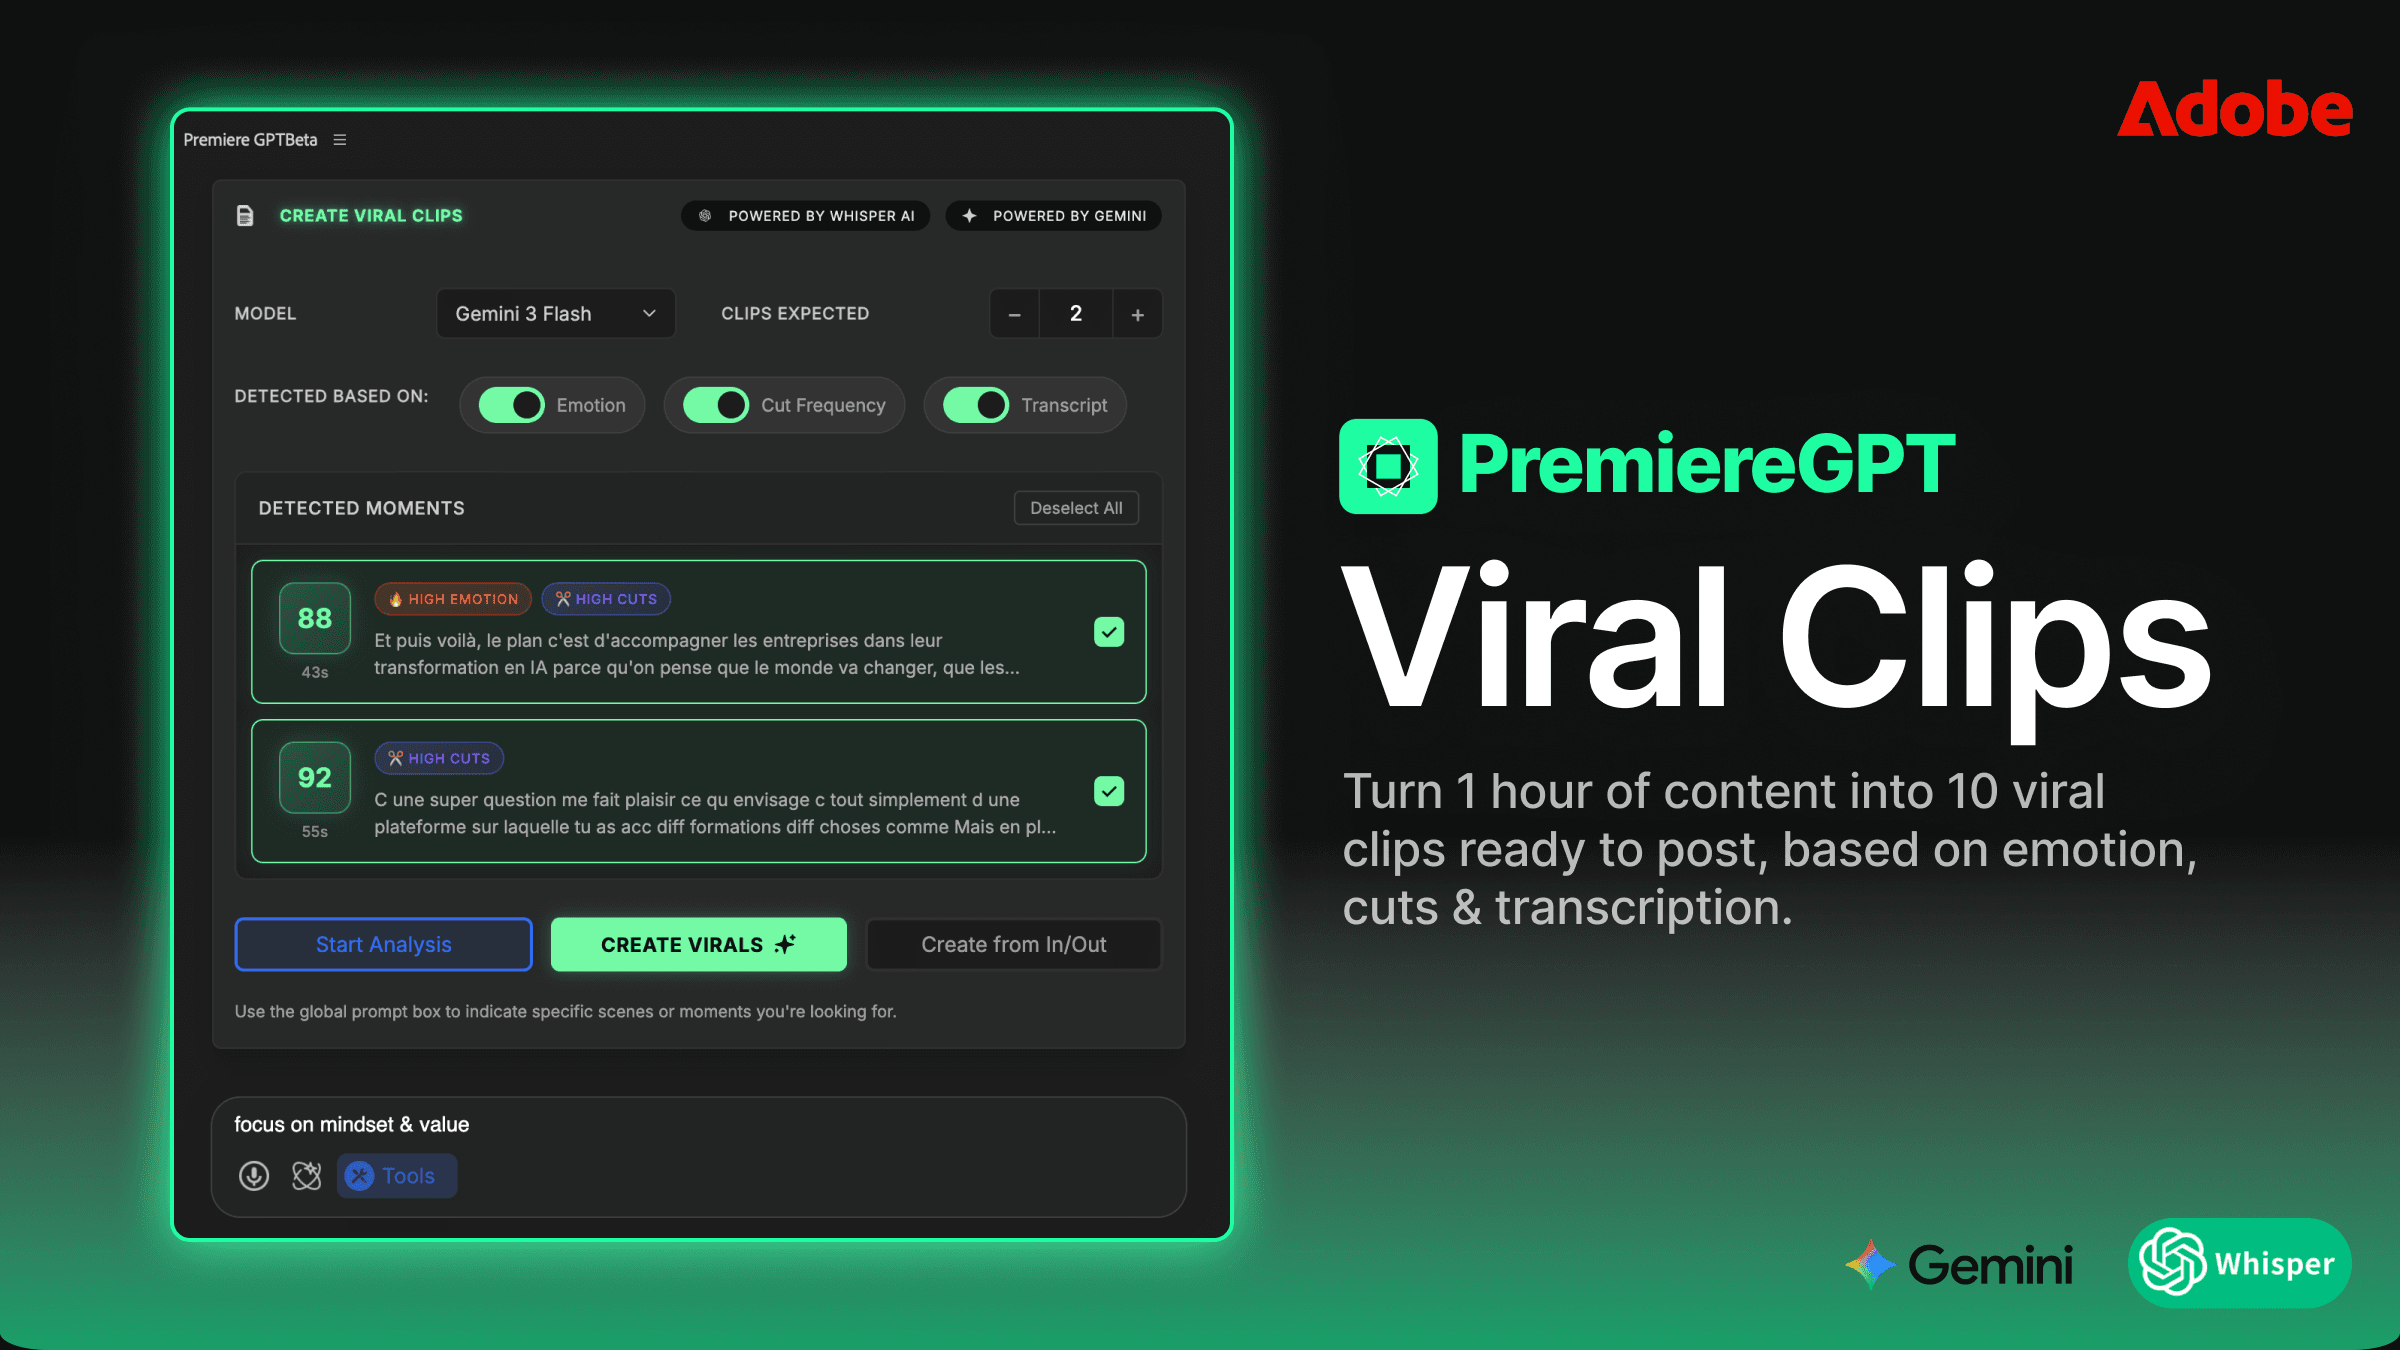
Prompting for Short-Form Clip Extraction
If you're repurposing long-form content for TikTok or Reels, prompt the Copilot to find self-contained story arcs or strong standalone moments within a longer interview. This is the workflow that Opus Clip markets as its core feature — AI-powered clip extraction for viral growth. PremiereGPT delivers this capability inside your existing Premiere Pro environment, for free, without sending your client's footage to an external server.
Comparison: Why 'Free to Use' Inside Premiere Beats Browser-Based Tools
Browser-based tools like Opus Clip have a fundamental architectural problem for professional editors: they require you to leave your NLE. Your footage goes up, gets processed, and comes back as a new file. Every step in that loop introduces friction, latency, and risk.
Privacy: When you upload client footage to a browser-based SaaS tool, you're agreeing to their terms of service regarding data storage and processing. For editors working under NDA — commercial work, corporate video, unreleased content — this is a genuine legal and professional risk. PremiereGPT processes everything locally within Premiere Pro. Your footage never leaves your machine.
Speed: The upload/download loop on browser tools can add 10–20 minutes to a workflow that should take 2 minutes. On a deadline, that's not acceptable. PremiereGPT operates directly on your timeline assets, which means processing time is determined by your local hardware, not a shared server queue.
Timeline Integrity: When a browser tool returns a processed file, you re-import it as a new clip. Your original sequence structure, color grades, audio mix, and multicam relationships are gone. You're starting over with a flattened render. PremiereGPT makes non-destructive edits directly in your existing sequence. Everything stays intact.
Cost: Opus Clip's paid tiers start at around $15/month and scale up significantly for higher usage limits. Autocut's pricing follows a similar model. PremiereGPT is completely free. There is no usage cap hiding behind a free tier. No watermark that appears after you hit a monthly limit. Free means free.
No Cracked Software Required: Unlike the risky path of downloading a nulled version of Autocut or a cracked Opus Clip workaround, PremiereGPT is a legitimate, officially distributed tool. You get the same professional output without the malware risk, legal exposure, or workflow instability that comes with unofficial software.
The architecture of a native Premiere Pro plugin is simply superior to a browser-based SaaS tool for professional editorial work. The fact that PremiereGPT delivers this natively, for free, makes the comparison straightforward.
Conclusion: Your New Workflow Starts Here
The best tools in a professional editor's kit shouldn't be locked behind a $300/year paywall, and they definitely shouldn't require you to risk your workstation on a cracked installer from an anonymous forum. Both of those paths — the subscription trap and the crack risk — are compromises that you shouldn't have to make.
PremiereGPT is the answer that the editing community has needed: a completely free, native Premiere Pro plugin that delivers AI-powered silence removal, watermark-free animated captions, and intelligent viral hook detection — all inside the NLE you're already working in, without a monthly fee, without a usage cap, and without sending your footage to someone else's server.
If you're currently paying for Autocut or Opus Clip, you now know there's a free alternative that matches the core functionality and beats them on privacy and timeline integrity. If you've been tempted by cracked versions of these tools, you now know there's a legal, stable, officially supported option that eliminates every risk those cracks carry.
The workflow upgrade is free. The only cost is the five minutes it takes to install the plugin and run through the tutorials above. Start there.
🎯 Free Download: The Viral Hook Shortcut Guide
Want to maximize your organic reach on TikTok and Reels from day one? We've put together a one-page PDF containing the exact AI Copilot prompts and caption settings to use with PremiereGPT for algorithm-optimized short-form content. These are the specific inputs that drive audience retention and viral growth — distilled into a format you can pin next to your monitor and reference during every edit.
Get the Free Viral Hook Shortcut Guide + Install PremiereGPT → [Get the Free Guide & Plugin]
